Introduction to ESP8266 and Firmware Updates
The ESP8266 is a highly integrated Wi-Fi module, widely recognized for its affordability and versatility in Internet of Things (IoT) projects. This compact module, equipped with a full TCP/IP stack and microcontroller capability, has become a staple in various applications such as home automation, smart devices, and remote sensing. Its popularity stems from its ability to connect to wireless networks, making it an essential component for developers seeking to build connected solutions.
Firmware updates for the ESP8266 are crucial for several reasons. Firmware, essentially the software that runs on the module, dictates its functionality, performance, and security. Over time, manufacturers release updates to address bugs, introduce new features, and enhance overall stability. One of the primary indicators that a firmware update is necessary is when the ESP8266 stops responding to AT commands. This issue can often be traced back to firmware inconsistencies or corruption.
Outdated firmware can lead to a host of problems, including connectivity issues, security vulnerabilities, and suboptimal performance. For instance, a device with old firmware may struggle to maintain a stable connection or fail to support newer network protocols. Moreover, security patches included in firmware updates are critical to protect the device from potential threats and exploits.
Keeping the firmware up to date ensures that the ESP8266 operates efficiently, benefiting from the latest enhancements and security measures. Consequently, regular firmware updates are a best practice for maintaining the reliability and longevity of IoT projects that rely on the ESP8266. This guide will walk you through the process of updating the ESP8266 firmware using the Arduino platform, ensuring that your module remains in optimal condition.
Preparing for the ESP8266 Firmware Update
Before commencing the firmware update for your ESP8266 module using an Arduino, it is essential to gather and prepare all necessary hardware and software components. Ensuring that you have everything ready will facilitate a smooth and error-free update process.
First, you will need the following hardware components:
- Arduino board (e.g., Arduino Uno)
- ESP8266 module
- Jumper wires (male-to-male and male-to-female)
- USB cable compatible with your Arduino
In addition to the hardware, the following software tools are required:
- Arduino IDE: This is the development environment used to write and upload code to the Arduino.
- ESP8266 Flasher Tool: This tool is used to upload the firmware to the ESP8266 module.
Once you have all the necessary components, the next step is to set up the hardware connections between the Arduino and the ESP8266. Follow these steps carefully:
1. Connect the Arduino to your computer using the USB cable. Before making any connection upload blank sketch in Arduino board. And check the port to which Arduino board is connected.
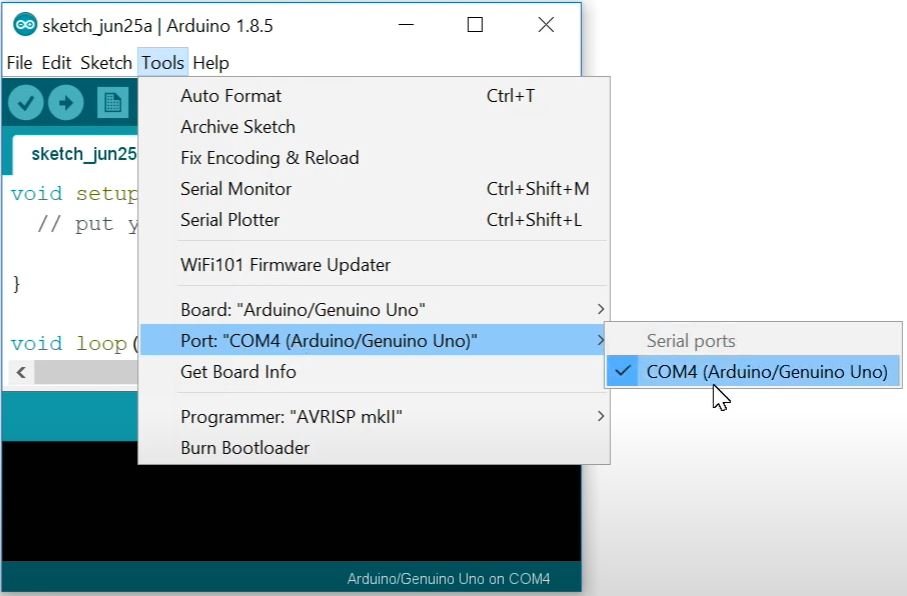
2. Use jumper wires to connect the ESP8266 module to the Arduino as follows:
- ESP8266 GND to Arduino GND
- ESP8266 GPIO0 to Arduino GND (to enable programming mode)
- ESP8266 VCC to Arduino 5V
- ESP8266 CH_PD to Arduino 5V
- ESP8266 RX to Arduino RX
- ESP8266 TX to Arduino TX
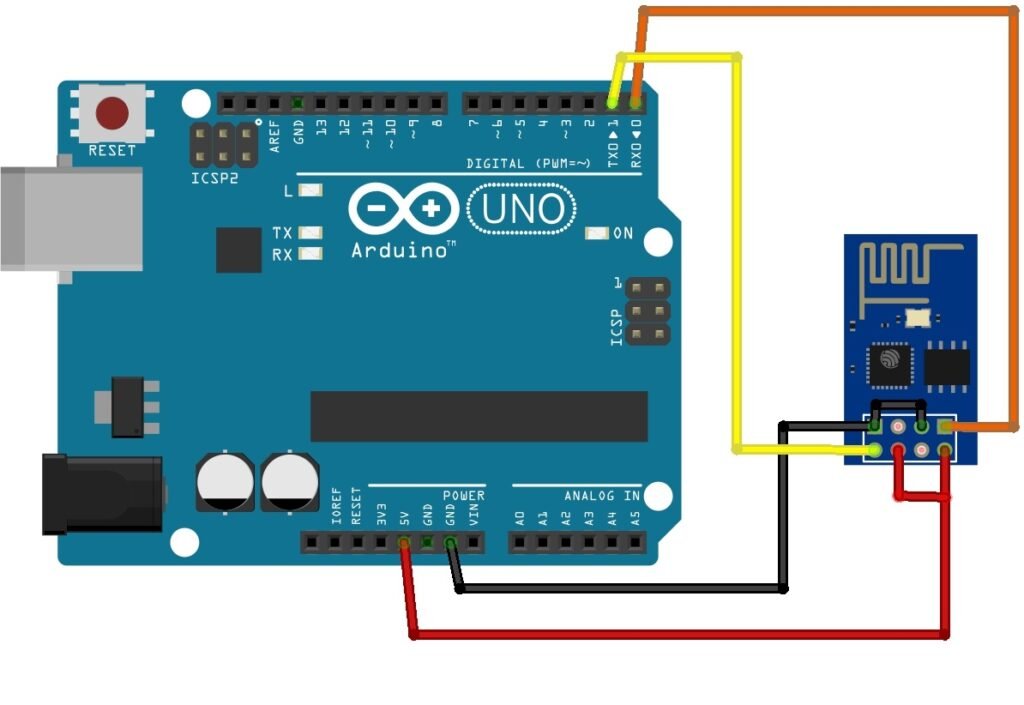
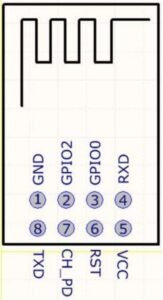
Ensure that all connections are secure and that there are no loose wires. It is advisable to double-check the connections to prevent any potential issues during the firmware update process.
With the hardware and software preparations complete, you are now ready to move on to the firmware update process. Following these steps meticulously will help ensure a successful update of your ESP8266 module.
Firmware Update Process Using Arduino
Power cycle the ESP8266 by disconnecting and reconnecting the power supply.
Next, download and open the ESP8266 Flasher tool on your computer. Select the appropriate COM port (COM port to which arduino is connected).

Select Bin and locate firmware.bin files.


Choose the firmware binary file depending on the module you are using. Here I’m using ESP8266 AI so will select AI-v0.9.5.0 AT Firmware.bin
Click the Download button to begin the update process. The progress bar will indicate the status of the firmware upload. Once complete, disconnect GPIO0 from GND and restart the ESP8266.


If you encounter issues, ensure all connections are secure and the correct COM port is selected. Restart the process if necessary. Common issues include incorrect wiring, insufficient power supply, or incorrect board settings in the Arduino IDE. In case you get error like Failed to write to target Flash, retry by connecting 100uf capacitor between Vcc & Gnd.
Failed to leave Flash mode Don’t worry about this. There is probably some error in the flasher. We are good to go. We have updated the ESP with the chosen firmware.

Post-Update Verification and Troubleshooting
Upon completing the firmware update on your ESP8266 using Arduino, it is crucial to verify that the update was successful. A reliable method to do this is by checking the ESP8266’s response to AT commands. These commands help ascertain the module’s functionality and ensure that it operates as expected.
To begin, open the Serial Monitor in the Arduino IDE. Enter the following AT commands to test the module:
AT – This command checks if the module is responsive. A successful response will return “OK”.
AT+GMR – Command to check firmware version
AT+CWMODE=3 – Set Wi-Fi mode to both Access Point and STAtion
AT+CWLAP – Command to List Access Points

AT+CWJAP=“SSID”,“password” – To join an Access Point

If any of these commands do not return the expected responses, troubleshooting may be necessary. Common issues include connectivity problems or incorrect responses to AT commands. Here are some steps you can take to resolve these issues:
1. Check Connections: Ensure that all wiring and connections are secure and correct.
2. Baud Rate: Verify that the baud rate in the Serial Monitor matches the configured rate during the firmware update.
3. Power Supply: Ensure that the ESP8266 is receiving adequate power. Insufficient power can cause erratic behavior.
4. Reflash Firmware: If issues persist, consider reflashing the firmware to ensure it was not corrupted during the update process.
Hopefully this helps you, check out other interesting blogs https://ihrprojects.com/blog/. You can also visit our youtube chanel https://www.youtube.com/@ihrProjects.

